
Friday, December 30, 2011
No Carpentry Mojo ...
Today I was terribly unproductive with playhouse construction, but it wasn't from lack of trying. Ele took the kids up to San Francisco for a good part of the day, so I had a prime opportunity to get a lot done with the playhouse. I tried to finish the dormer roof framing, but I got no where. The remaining pieces need some complicated compound cuts, and I miscalculated how the plywood pieces will fit. All that threw me off my game I guess. Also I was building very intensely for several days up to Christmas eve. Then I took a five day break from construction, so I must have lost my carpentry mojo. All I have to show for several hours of work is one little plywood piece for the dormer roof pictured below. I'm quite disappointed. Before, I've done far more in far less time.

Saturday, December 24, 2011


Playhouse Loft Railing
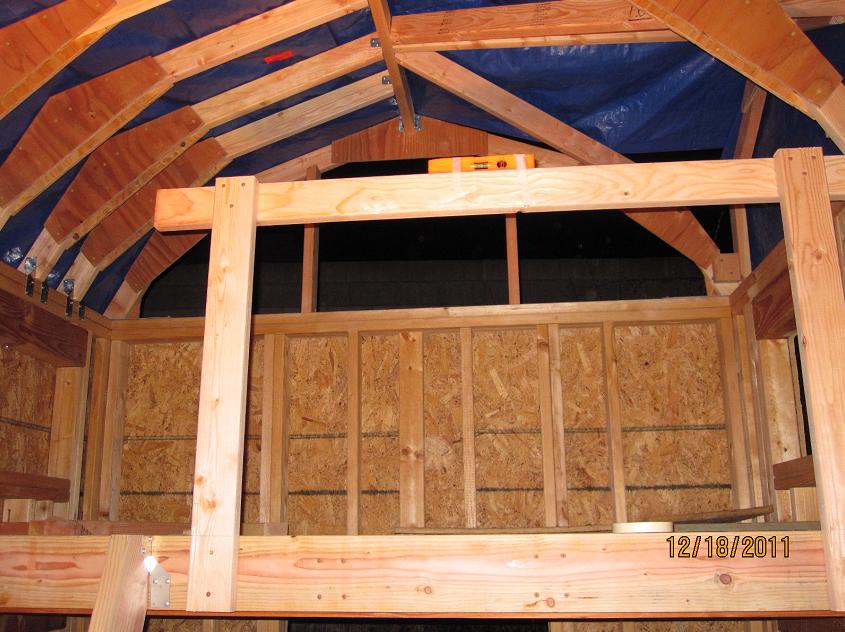
This post counts for December 23rd. I stayed up VERY late last night working on the playhouse in the FREEZING cold. It was so cold my fingers hurt even with gloves on! I finished making the loft railiing safer by installing the balusters. I also installed the 2x4's that work as the hand rails on top of the loft railing and ladder railing. I also put in a self-closing gate at the top of the ladder to keep people from falling off off the ladder opening to the loft. I made the gate self closing by attaching the gate to a string that is connected to a counter weight. When the gate opens, the counter weight pulls on the string to pull the gate closed. I also had to disassemble and rebuild the steps on my ladder, because they were too unstable.
I had to stay up late to get this all done, before showing it to my parents on Christmas eve. I didn't have a second to spare to even take pictures last night, so I took them this morning. (That's why the picture has a 12/24/11 date stamp.)


I had to stay up late to get this all done, before showing it to my parents on Christmas eve. I didn't have a second to spare to even take pictures last night, so I took them this morning. (That's why the picture has a 12/24/11 date stamp.)


Thursday, December 22, 2011
Playhouse Safety Rails
I had just enough time this morning to install temporary safety "railings" on the windows around the loft. Renee also helped me do it. I want to put the railings up now so that Russ, Renee, and their friends can safely play in the playhouse next week, while I take a break from construction. It will be gratifying to see the kids enjoy the playhouse when I get it to a usable state even though it still needs, windows, doors, a roof, siding, etc.


Wednesday, December 21, 2011
Playhouse Ladder Drawing
Here is the drawing for the playhouse ladder. The drawing title says "Stairs," but I should have used the word "ladder." I didn't get to work on the playhouse today or sketch, so this drawing will have to do.


Tuesday, December 20, 2011
Playhouse Ladder Railing
Today I went to work in the afternoon, so I had just enough time to work on building a railing for the ladder. I got a lot done, and I'm pretty pleased with how much I did in two and half hours. As the pictures show, I built the main part of the ladder railing. (I took the pictures tonight, but I built it this morning.) I just have to add a top plate for people to hold as they use the ladder. As an added "bonus" the ladder railing helps stabilize the loft railing a lot, because I made the top of the ladder railing contact the loft railing.


Monday, December 19, 2011
Playhouse Railing
Today after work and going to Home Depot, I only had a little time left to added another vertical 2x4 to the middle of the railing and lots of lag screws along the bottom. The railing is a lot stiffer, but still a little shaky. I want to add a railing to the ladder as well.


Sunday, December 18, 2011
Playhouse Ladder and Railing
Today I finished the ladder to get up to the loft and started the railing. The stairs took me longer than it should have because I messed up on the spacing of the steps. I didn't realize the problem until I had two steps left to install! The basic frame for the railing is up, but it's still shaky, and I need more lag screws to secure it to the loft.


Saturday, December 17, 2011
Playhouse Loft II
Today, I had to remove the spacer blocks, trim them about a quarter of an inch so they would not stick out past the bottom edge of the 2x6, and re-install the spacer blocks. Then I installed the 2x6 over the spacer blocks. I was hoping to put stairs in the playhouse to give Russell a chance to practice walking up and down stairs, but there is just not enough room to put stairs in without taking up a lot of space. So I started to build a "ship ladder," which is basically a ladder with a slight incline that is often used on ships.


Friday, December 16, 2011
Playhouse Loft
After work today, I finally found some time to work on making the loft level safe for kids to play on before I completely finish the playhouse. Right now the front edge of the loft level has plywood hanging over the joist by an inch. So I had just enough time to install the 2x4 spacer blocks underneath the protruding plywood edge picture below. Then I will cover the front end of the loft with a 2x6, to give me a large flat surface for mounting the railing and stairs.


Saturday, December 10, 2011
Playhouse Valley Rafters
I only have two new pieces of wood installed on the playhouse to show for many hours of work. These two pieces are by far the most complicated pieces of wood I had to cut because they require compound angle cuts. Between my CAD program and the trig functions on my iPod calculator app, I was hoping to figure out the exact angles I needed to cut. But it didn't workout that way partly because I changed the dormer framing design on-the-fly and partly because there is a difference between designing a playhouse in the virtual CAD world and building a playhouse in the real world. I ended up cutting test pieces of wood to find the approximate angles I needed by trial and error. So some ends of the valley rafters assemble with gaps and don't fit perfectly, but that's okay.


Tuesday, December 6, 2011
Dormer Roof Framing Restarted
Here's the latest pics of the dormer roof framing after I lowered the height 1.75". So it looks very much the same as yesterday, and you have to take my word for it that it's lower.


Monday, December 5, 2011
Dormer Roof Framing Started
I started framing the dormer roof today. As I expected, it's proving to be the most difficult part of the roof. Contrary to what I expected, it's even more difficult than I thought, and could not finish it. In fact, I have very little to show for my work today. Plus I discovered that what I built is too tall. So I have to disassemble a lot of what I built and make it shorter tomorrrow.


Sunday, December 4, 2011
"Half Trusses" Are In
I finished cutting the wood and assembling the "half trusses" that support the northeast corner of the roof. Tomorrow I am taking a day off from work, so I will have time to finally frame the dormer roof, which will be the most complicated part of the roof. I was hoping to start the dormer today, but I wasn't as productive as I hoped.


Saturday, December 3, 2011
More Roof Framing
Today we had to go to a family wedding, so I only had enough time to make some more pieces for the remaining trusses and install the ridge post I show in the second picture below.


Friday, December 2, 2011
Roof Framing Drawing Rev 3
In know it looks virtually the same as yesterday's Rev 2, but I changed the dimensions for the valley rafters. So if you look carefully at the top two views, you can see the changes.


Thursday, December 1, 2011
Roof Framing Drawing Rev 2
I added two pages to my roof framing drawing to document my new dormer framing design. I'm still not quite happy with how the dormer rafters connect with the valley rafter as shown on the last page. To help me design the roof faster, I created a CAD model for the whole roof framing, instead of modeling each piece of wood separately and then assembling the pieces. Tomorrow I think I will make dedicated CAD models of the dormer rafters and valley rafters and assemble them to double check I can cut the wood and assemble the parts as I want.


Wednesday, November 30, 2011
Dormer Frame Design Done!
Okay. This should be the final design for the dormer framing. I just need to make some drawings for quick reference as I build it.


Tuesday, November 29, 2011
Dormer Framing ... Still!
Geez! Designing this dormer framing is taking way longer than I thought. Tonight I rethought the framing for the very tiny dormer walls. I even included very tiny top plates for the walls, and I wonder if they are even necessary since the walls are so small. Then I had to do a lot of work to figure out the design for the valley rafters, which I was missing last night. Tomorrow I need to add the dormer trusses, and I should be done.


Monday, November 28, 2011
Dormer Framing
I stayed up tonight to finalize the dormer framing design, but I didn't figure it out. Here's what I came up with so far. I don't like it because the dormer roof is not well supported at one corner. I'll have to figure this out tomorrow.


Sunday, November 27, 2011
Playhouse End Trusses
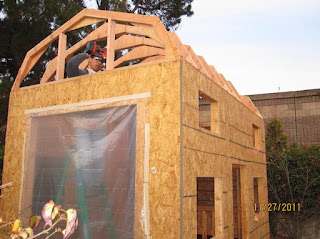
I finished installing the Simpson brackets. Then I added some studs to reinforce the end trusses. Rene took this pic of me working on the west end truss. The second picture I am posting just for fun as all the trusses are starting to resemble a tunnel from this angle.


Saturday, November 26, 2011
More Trusses!
I worked very late Friday night to make four more trusses. So here is a pic of the playhouse with a total of eight trusses. I still need to finish securing the trusses with Simpson brackets. I installed some brackets, which are visible in the second picture, but I ran out of time to install all of them. The next step will be to install two or three more trusses for the east end of the playhouse, which will have a dormer roof over the loft.


Thursday, November 24, 2011
Playhouse Tarp On!
Here are pics of the playhouse wearing its new tarp roof. I was a little concerned as we put it on, because it started getting windy. I really don't want the tarp to blow away as we live right next to a freeway. Originally, I was hoping to tack down the tarp with nails running through grommet holes in the tarp. But that didn't work out. So I had to use the staple gun, which will make it a pain to remove the tarp later.


Playhouse Roof Progress!
This posting counts for Wednesday, November 23rd. I finally feel like I made progress with the playhouse! The weather forecast was for rain on Thursday, so I was really driven to put some kind of cover over the structure to stop rain water from pooling on the floor again. I needed to put up the bare minimum of four trusses, to put a tarp cover over the top. Ele stayed up past midnight with me to help me put up the trusses, and she took these pictures. I'm pretty stressed about all this building stuff right now. This would be a lot more fun, if I didn't have a full time job. Props to Ele for putting up with me and helping me so late a night. Most other wives would have told their husbands to take a hike and gone to sleep.


Tuesday, November 22, 2011
Playhouse Roof
Well I tried to get movin' today, but I didn't get very far. I ended up going to Home Depot three times today! I definitely was not a model of efficiency. The biggest problem was that I discovered the Simpson mending plates I wanted to use to build my roof trusses had the warning not to use them for trusses engraved right on the parts. So I couldn't ignore that warning. I saw the sheds Home Depot sells are built with these plates for their roof trusses, so I thought they were safe to use. Now my plan is to fabricate my own truss connections out of plywood, which was the reason for Home Depot trip #2 today. Now I will need to spend more time than I expected making the plywood connections. So by the end of today, I only cut pieces for my truss template, and I still have to connect the pieces. Here's the roof plan I made, which I thought would give me a running start on the roof. But oh well ...


Monday, November 21, 2011
Playhouse South Wall Done!
Well at least the south wall is done enough for me to finally start working on the roof. And not a moment too soon as the forecast is for rain on Thursday. I gotta get movin'!


Sunday, November 20, 2011
Playhouse South Wall vs. Rain
I really hate winter right now. The days are shorter and it's raining a lot. A corner of the playhouse floor has been accumulating rain water, so today I was bailing out water with my dust pan like I was on a sinking ship. This past summer was really hot, but now I miss it! So with all the rain delays, I only had time to finish cleaning up my rough cut of the south wall door, install a bunch more screws, and do the rough cuts for the bottom windows.


Saturday, November 19, 2011
Playhouse Progress
Today I spent several hours installing more screws and cutting out windows. I finally finished the south wall and made some progress with the north wall. Here are pictures of the completed south wall and of me working on the north wall.


Subscribe to:
Posts (Atom)